
How to Create a Distance Matrix in QGIS
This tutorial shows GIS end users how to effortlessly make a distance matrix and calculate travel times between multiple origins and locations applying QGIS and the TravelTime plugin.
Introduction
A distance matrix is a two-dimensional array made up of the distances between various places. Making a distance matrix can be advantageous for various causes. For instance, they are made use of in transportation planning for calculating vacation situations for common origin-location routes. In retail retail outlet planning, they are employed for calculating consumer vacation situations from their houses to the retailers’ present-day spots, competitor spots and prospect places.
There are several equipment readily available for creating a distance matrix. For instance, QGIS has a developed-in Distance Matrix resource that is observed less than Vector, then clicking “Analysis Tools” and following, “Distance Matrix.” Furthermore, you can lookup for plugins that estimate distances amongst locations using the look for time period “distance” underneath “Plugins” and clicking “Manage and Install plugins.”
Which resource you pick out relies upon on the use case: For illustration, if you basically want to estimate straight line distances, the QGIS Length Matrix software will do, but for incorporating real routes, actual travel instances with distinct transportation modes, the TravelTime plugin would be the very best match. In this tutorial, we’ll work out the travel instances involving multiple random origins and destinations applying the TravelTime plugin, which can generate quite a few origin-desired destination pairs pretty quickly.
How to use the plugin to produce a matrix of journey occasions
Prior to we can use the TravelTime plugin and generate a distance matrix, we need to have to develop some place facts in the variety of various origins and destinations. This is a two-phase procedure consisting of producing some random British isles postcodes and then geocoding them with the TravelTime plugin.
To produce some random United kingdom origin and places, you can use this site and copy-paste the effects within two diverse Notepad documents: a person known as origins.csv with 5 addresses and one particular identified as destinations.csv, containing 10 addresses. Save both of those files as CSV documents with a header that names the deal with discipline, which is useful when importing them into QGIS later. In this tutorial, we’ll use the subsequent 5 random origins:

As for the destinations, we’ll use the following 10 United kingdom postal codes:

Upcoming, open up up QGIS and make a new Undertaking file. Insert a basemap of your preference to your map canvas. Listed here, we used Esri Regular basemap that is accessible through the Speedy Map Services plugin.
We’ll now geocode the addresses so they can be positioned on a map. For this element of the tutorial, you’ll require to have the TravelTime plugin for QGIS set up and activated with an API critical. You can get the plugin and API crucial listed here.
After receiving the API vital, click on the “Configure TravelTime system plugin” button on the ideal of the TravelTime menu in QGIS and duplicate-paste the app ID and API important to begin employing the plugin:
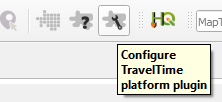
This is the TravelTime menu button in QGIS for configuring the plugin. (Graphic: Eric van Rees)
To start geocoding, opt for “Processing Toolbox” in QGIS, decide on the TravelTime plugin, then “Geocoding” under “Utilities.” Make certain the enter fields match the picture down below.

Your input really should match these QGIS TravelTime geocoding tool parameters. (Image: Eric van Rees)
Subsequent, click on “Run” and repeat the exact same technique for the locations table. The map down below reveals the origins in red and the destinations in blue, retitled as “origins” and “destinations:”

The geocoded origins are pink and the locations are blue on the QGIS map. (Graphic: Eric van Rees)
To double-check out if the resource geocoded all addresses, open up up both equally attribute tables to see the amount of rows. The origins desk need to checklist 5 rows and the locations table, 10.
With these geocoded addresses, we are completely ready to start applying the TravelTime plugin and generate a distance matrix with the vacation moments for each origin-destination trip.
Generating a distance matrix making use of public transport details
We’ll now create two diverse journey matrices: one for general public transport journeys and 1 applying driving times. We’ll get started with the length matrix for community transportation.
Using community transport facts, we can accomplish an extensive distance analysis and estimate travel situations from numerous origin-location routes extremely swiftly. The distance matrix functionality is accessed by choosing the TravelTime toolbox beneath Processing Toolbox and clicking “Simplified,” then “Time Filter Easy.”

Pick the Time Filter – Basic tool from the TravelTime plugin for QGIS. (Picture: Eric van Rees)
Future, pick the origin and desired destination stage options as inputs for the software, and set the driving time to 240 minutes, which is the greatest total of time that the resource accepts as enter.

Your TravelTime Time Filter – Very simple instrument parameters window will seem like this. (Impression: Eric van Rees)
Click “Run” and search at the map, in which new facts has been extra. You will see a new output layer with “reachable” and “unreachable” locations in just the maximum driving time from the diverse origins.

This is the output layer of the Time Filter – Uncomplicated device. (Impression: Eric van Rees)
A brief inspection of the map exhibits us a few unreachable destinations in the north of the state, which is logical: These are almost certainly hard to reach within just 4 several hours utilizing public transport from the specified origin destinations. Subsequent, open the attribute desk to see the distance matrix, which is the principal output of the instrument.
A fast inspection of the attribute table shows a full of 50 rows, which corresponds to the quantity of doable origin/destination combos (5×10). The 2nd column, named “reachable,” incorporates a or 1 which is a Boolean benefit with corresponding to False and 1 to Accurate.

These are the initial two rows of the distance matrix for the Time Filter – Easy device. (Impression: Eric van Rees)
On the other hand, it’s challenging to make out the personal origin-spot data from this attribute table. Utilizing the Innovative Time Filter instrument, we can specify the distinctive addresses for the distinctive input and output fields, which are taken care of in the output. For the origins, specify the Departure ID discipline as “address” and the vacation time in seconds (four hrs is the utmost amount, so 14400 seconds). Depart the arrival fields open, specify the Locations layer as the Destinations parameter and simply click “Run.”
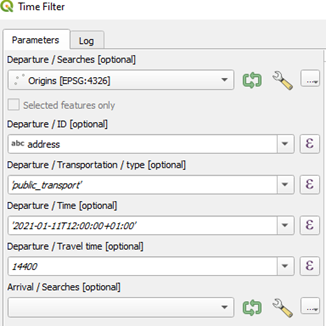
The Time Filter – Sophisticated software parameter window, concluded. (Graphic: Eric van Rees)
Wanting at the output attribute desk, we see equally the origin and place handle mentioned for each row, which makes it simpler to see the unique origin/location pairs for every row in comparison with the Time Filter – Straightforward instrument.

The output for the distance matrix for the Time Filter – Innovative resource will search like this. (Picture: Eric van Rees)
Building a distance matrix applying driving time knowledge
We’ll now build a length matrix utilizing generate time details instead of general public transportation info, which also returns the distance amongst the origin and desired destination. Repeat the similar methods as before when generating the length matrix for general public transport, but now use “driving” as transportation kind.
Wanting at the output, we see a new feature layer included to the map with reachable and non-reachable locations. The instrument now returns journey distance (in meters) to a reachable destination by automobile, in the column prop_length that is detailed in the attribute table. (You want to scroll to the far-appropriate columns to be capable to see it.)

The distance matrix utilizing “driving” as transportation mode returns vacation distances. (Graphic: Eric van Rees)
Employing the Time Filter Innovative tool, we get far more details about the origin-place pairs per row. To double test that the mentioned distances are proper, we see that the to start with entry states an origin place/destination from Birmingham to Liverpool, with a journey length of roughly 160km.

(Graphic: Eric van Rees)
We can check out that this is proper using Google’s routing device, which provides a corresponding travel distance by car or truck.

Google’s routing instrument returns a very similar journey distance by auto as the TravelTime QGIS plugin for the Birmingham-Liverpool trip. (Impression: Eric van Rees)
Summary
The TravelTime plugin has the capacity to produce vacation time and distance matrices and evaluate public transportation knowledge. In the illustrations previously mentioned, we have proven that we can make a lot of origin-destinations at as soon as, together with the travel distances employing the Time Filter software from the plugin.
This sort of info is really valuable for a range of authentic-life use scenarios. For illustration, the software can be used to see how lots of staff of a enterprise can arrive at a functioning site from their homes in a specific time limit. By introducing a GIS layer of demographic details to the journey instances, it gets attainable to see how lots of men and women of a sure demographic dwell in just a commutable length of a health care facility or shop. The add-in can also be utilized to examine what local facilities a new business area demands, e.g. going for walks journey time to factors of curiosity such as supermarkets, cafes and much more.


